How I Develop Black & White Film
If you, like me, always wanted to develop your own film but didn’t know where to start, this is for you. Black and white film is cheap and easy to do on your own, and you can blow those digital ‘black & white’ conversions out of the water in no time.
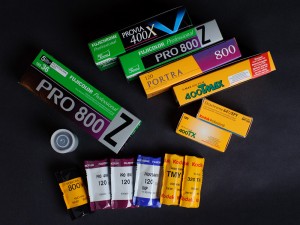
What is ‘real’ black & white film? Basically anything that doesn’t have “Process C-41” printed on the outside of the box. Some common ones are Kodak T-Max, Kodak Tri-X, Ilford Delta, Ilford HP-5, and Fuji Neopan. Out of all those, I like the Kodak films the best, and shoot T-Max 400 the most.
PART I – Equipment & Chemicals

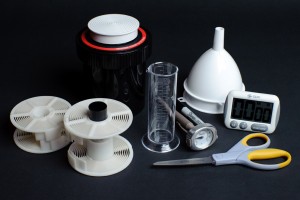
At a minimum, you will need the following physical equipment:
- Light-tight developing tank and reel. [I have plastic.]
- A thermometer.
- Some containers for the chemicals. [I use mason jars.]
- A measuring cup.
- A pair of scissors.
- A can opener (for 35mm film only).
- A timer.
- Gloves, eye and clothing protection.
Optional, but helpful:
- Gradients for measuring 100mL and 500mL.
- A light-tight changing bag, the bigger the better.
- Funnels.
For my process, you will need the following chemicals:
- Developer [Discussed later]
- Stop bath
- Fixer
- Distilled water
A good idea to get these chemicals, but they are not critical:
- Hypo Clearing Agent
- Photo-Flo
- Hypo Chek
PART II – Loading & Processing
After mixing the above chemicals according to the instructions on the label, here are my processing steps:
1. Shoot the roll of film.
1a. You can shoot the film at any Exposure Index (EI), which is analogous to changing the ISO on a digital camera. Just record or remember what EI you set the camera to!
1b. For 120 film, when you remove the roll from the camera, you lick the paper tab to wrap it tight, like on an envelope. Fuji has a sticker instead, which I like better.
2. In a light-tight environment, load the used film onto the spool. This can either be a changing bag or underneath a stack of blankets at night – I’ve done both.
For 35mm film:
3. Inside the light-tight environment:
3a. Pop off the bottom of the canister with a can opener.
3b. Pull the roll off and cut off the leader with you scissors.
3c. Load the film onto the developing reel.
3d. When you get close to the end, cut off the film from the spool.
For 120 format film:
3. Unfurl the film and load it on the spool. When the film gets close to the end, it is taped to the paper backing. Cut off the film just at the tape.
3a. If you wind too far, it will start pulling up the paper, which is a pain.
3b. You can alternately pull off the tape, leaving the full roll of film. No scissors needed.
4. Put the spool in the developing tank and secure the lid.
—The rest can be done in the light, because the film is secure in the tank.—
(Put on your protective clothing – gloves, goggles, and apron.)
5. Bring the chemicals up to temperature.
6. Start the timer.
7. Pour in your developer. I time this so that the chemicals are completely poured in at the 1 minute mark, which is where I start timing.
8. Agitate according to the instructions, lifting and twisting the tank with one hand about once per second.
8a. For T-Max films, I agitate for the first 30 seconds, then 5 seconds every 30 seconds afterward.
8b. I use the last 10 seconds of the time to pour out the chemicals. Time isn’t ultra-critical, don’t fret over being exact!
9. Pour the developer back into its container. [I re-use all my chemicals until they die.]
10. Pour in the stop bath and agitate for 30 seconds, then pour it out.
11. Pour in the fixer.
12. Agitate for 30 seconds, then every 30 seconds like when developing. I always fix for the maximum time recommended, according to the label on the fixer. For KodaFix, I do 5 minutes.
12a. You can check to see if your fixer is dead by dropping a couple drops of Hypo Chek in it.
12b. If your fixer dies/is dead, the negatives will come out muddy – the edges will not be clear. You can always re-load the film and re-fix it!
13. Pour the fixer back into its container.
—Open the lid at this point. If the sides look muddy like in 12b, feel free to re-fix!—
14. Rinse in running water for 30 seconds.
15. (Optional) Pour in the Hypo Clearing Agent, and agitate for two minutes total time, and pour it back.
16. Wash the film. I use running tap water. I’ve seen three methods discussed:
16-i. Fill the tank with water and then run the water slowly enough for a complete change of water in the tank. [How you get the water running this slow, I don’t know.]
16-ii. Fill the tank to overflowing and dump it out, repeating 10 times. [This is usually how I do it.]
16-iii. Fill the tank, agitate for 5 seconds, then dump. Then fill, agitate for 10 seconds, dump. Finally fill, agitate for 20 seconds, then dump. [This is the ‘Ilford’ method.]
17. (Optional) Fill the tank with Photo-Flo for one minute, with gentle agitation at the beginning. Pour it out.
18. Hang to dry. I use my shower, hanging the film from the shower curtain rod and weighing both ends with binder clips.
PART III – References
Those steps are essentially in this document that you will want to download and print out (I’ll call it J86 for reference): http://www.kodak.com/global/en/professional/support/techPubs/j86/j86.pdf
Page 12 of J86 is the basis for these steps, and shows the times for each one, minus the time for developer. [See my note at the end about the mistake on page 12!]
Why doesn’t it include time for developer? Because you can use any developer brand, and the amount of time to develop depends on these things:
- What developer you use: brand and strength
- The film type
- The film speed that you shot it at
- The temperature
There is an incredible free resource, where you select your developer and film and it will tell you the time and temperature to use. It is called the Massive Dev Chart: http://www.digitaltruth.com/devchart.php
The major developers that I’ve seen used are:
- T-Max Developer (Kodak)
- D-76 (Kodak)
- Rodinal (various brands)
- Coffee (do-it-yourself)
There are tons more, of course. I’ve always used T-Max Developer because it is liquid, easy to use, and there is the lovely chart on page 10 of J86 that tells me what time and temperature to use. T-Max developer is supposed to be good for pushing film, and since I usually shoot between 1 and 3 stops over the rating, this works for me too. I mix it one part T-Max Developer to 4 parts water. If you’re interested in the others, I would recommend checking out APUG.
You’ll notice on page 10 in J86 that you can use different temperatures. The times and temperatures aren’t ultra-critical, but the closer you are the more consistent will be your output! I like to develop at 75° F, which would be between 6 and 9½ minutes depending on my shooting EI.
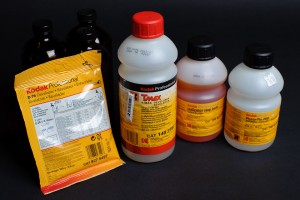
The chemicals I use for my process:
T-Max Developer
Kodak Stop Bath (Freestyle will ship this, B&H will not. Stupid.)
KodaFix (You will want a hardening fixer. I believe that non-hardening fixers are more for paper.)
Hypo Clearing Agent
Photo-Flo
Some tricks and/or notes that I picked up:
- Buy a cheapo roll of film to practice loading in the daylight. It isn’t difficult, but helps to see it first.
- Yes, sometimes the chemicals will spill from the tank. I find this is more likely with the less viscous color chemicals than with the black & white ones.
- I have two plastic reels – one with a big fat tab and one with a really skinny one. The big fat tabs make it super easy to load.
- It is more difficult to load film onto wet plastic spools.
- Some people hate plastic spools.
- For black & white film, you don’t need to ‘pre-wet’ the film. I got this advice initially, but have since stopped doing it.
- If you omit the Hypo Clearing Agent, it is more difficult to wash out the fixer. The Hypo Clearing Agent helps flush the fixer from the film.
- If you omit the Photo-Flo, you may get water streaks on your film.
- Tri-X film comes out a little purple. The better wash you do, the less purple it looks. As it dries, it goes away a little – unless the film isn’t properly fixed, in which is always looks muddy.
- IMPORTANT: Time and/or temperature are not ultra-critical! It is most important for the developer step, but I’ve found a good bit of ‘wiggle room’ in pretty much all the times. Film is very flexible!
- Mistake on page 12 of Kodak publication J86! The ‘Agitation/Notes’ for steps 4 and 5 are reversed.
Some links!
B&H’s black & white films.
Freestyle Photo’s list of black & white films.
Freestyle Photo – freestylephoto.biz
Photographer’s Formulary – http://stores.photoformulary.com/StoreFront.bok
APUG – the Analog Photo User Group – http://www.apug.org/forums/home.php

